

This post follows on from a previous post, espousing the virtues of the WordPress REST API for hybrid mobile app development.

At the 2016 WordCamp in Belfast, I gave a talk about using the WordPress REST API for mobile development. I gave two code walk throughs at the conference; what follows is a walk through of the football mobile app.
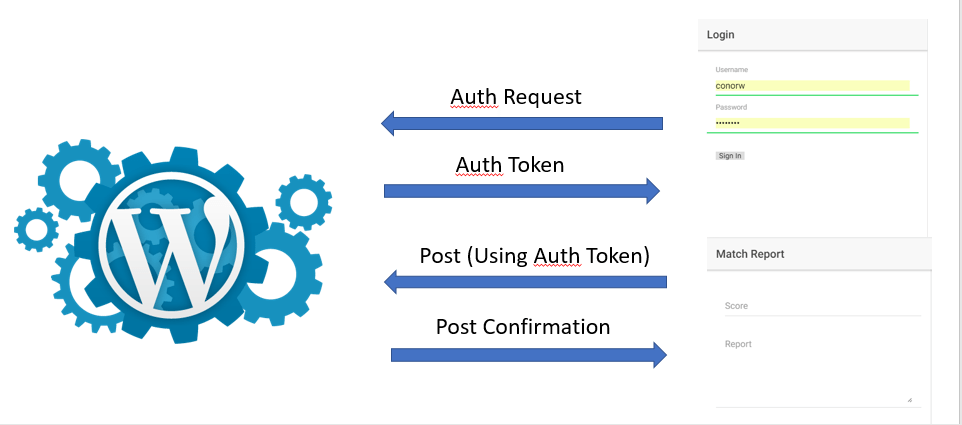
The football app uses Ionic to create a cross platform mobile app that:
- Connects to a remote, REST API enabled, WordPress site.
- Authenticates a username and password from the device (using JWT – JSON Web Tokens).
- Shows a ‘Result’ screen. The screen allows users to input a score and match report.
- Posts this ‘Result’ to the remote WordPress site.
N.B. All the Ionic 1 code is available on Github. There is also an Ionic 3 code repo available here.
The steps to create a shiny new mobile app, which allows soccer coaches to post match results from their phones, is as follows:
Ionic 3 to WordPress
WordPress Site
We need to first create a WordPress website which will act as our back end engine to our app.
- Create a new WordPress site (or use an existing one).
- Install and activate the following plugin:
- JWT Authentication For WordPress REST API: https://en-gb.wordpress.org/plugins/jwt-authentication-for-wp-rest-api/
- Make sure to set your auth key after activating the plugin, e.g.:
define('JWT_AUTH_SECRET_KEY', 'your-top-secrect-key');
*Also on some servers you will need to enable http auth in your .htaccess file
RewriteEngine on
RewriteCond %{HTTP:Authorization} ^(.*)
RewriteRule ^(.*) - [E=HTTP_AUTHORIZATION:%1]
Mobile App
- Install Node on your machine.
- Install Ionic and Cordova using the following NPM command/cmd:
npm install -g cordova ionic - Download the github code (cd to the folder you want to put it in first)
git clone https://github.com/conorw/wp-rest-api-ionic.gitOr for Ionic 3
git clone https://github.com/conorw/wp-rest-api-ionic2.git - Using the command line navigate (cd) into the created directory
cd wp-rest-api-ionic- Get node to install Install the projects dependencies
npm install
- Change the ionic.config.json file to point to the URL of your new WordPress site
{ "name": "teamthingmobile", "app_id": "", "proxies": [ { "path": "/server", "proxyUrl": "https://thenameofyoursite.com" } ] } - Start Ionic to show a web verison of your app
ionic serveDone!
You should now have a working mobile app, executing in your browser, which you can now use your WordPress credentials to login.
If not? Give me a shout below…….
In the next post I will highlight the important code in the sample, and explain what it means.
*For an Ionic 3 version of the code see this post.
Hi , I get
SyntaxError: Unexpected end of JSON input
at JSON.parse ()
at Response.Body.json (VM1195 main.js:58962)
at MapSubscriber.project (VM1195 main.js:46242)
at MapSubscriber._next (VM1195 main.js:45817)
at MapSubscriber.Subscriber.next (VM1195 main.js:15326)
at XMLHttpRequest.onLoad (VM1195 main.js:59371)
at t.invokeTask (VM1178 polyfills.js:3)
at Object.onInvokeTask (VM1195 main.js:4613)
at t.invokeTask (VM1178 polyfills.js:3)
at n.runTask (VM1178 polyfills.js:3)
at XMLHttpRequest.invoke (VM1178 polyfills.js:3)