

Ionic 3 + Angular 4
This post follows on from posts about hybrid mobile app development using the new WordPress REST API and Ionic: Part 1, Part 2, Part 3
Part 3 contained a walk through of the Ionic 1 code. What follows is a walk through of the code for an Ionic 3 app.
From following the steps in part 2 By now you should have a [very basic] Ionic app running in your browser. The app will allow you to:
- Authenticate with your remote, WordPress REST API enabled, website.
- Make a post from the mobile app to your WordPress site.
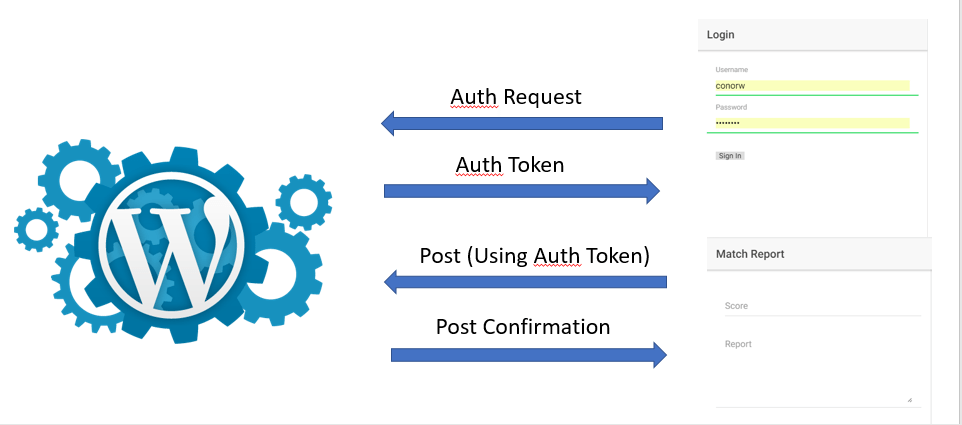
Ionic 3 to WordPress
Pretty simple stuff.
The code that performs the magic is pretty simple too.
Ionic Project Structure (Ionic 3)
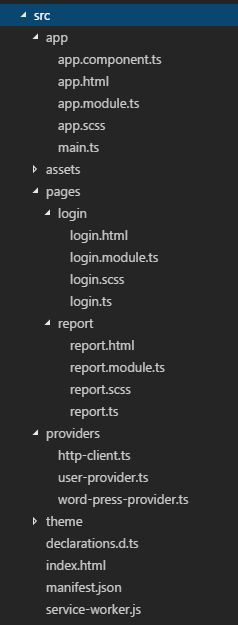
Ionic 3 Project Structure
As you can see from the folder structure below there are quite a few folders in our Ionic App.
However, the important files and folders are as follows:
- src/app: The 1st component to be shown on screen for the app. Things like navigation routes are configured here.
- src/pages: The pages for the app are in here i.e. the Login and Report pages.
- src/providers: This folder contains reusable services to perform business logic e.g. authentication and connection to WordPress
- ionic.config.json: This file contains configuration options for the app. In Part 2, we changed a setting in this file to point to our WordPress site.
The folder structure is much like any other Angular 4 application, so we will head straight to the code to see what the key lines are:
/app/app.component.ts
As this component is the entry component for this app we configure if the user should be navigated to the Login or Report screens on startup.
In this file we:
- Start listening to our UserProvider (see user.provider.ts) to see if the logged in/out event is fired.
- If the logged in event fires navigate to the Report page, otherwise go to the Login page.
constructor(
    private events: Events,
    private userData: UserProvider
  ) {
    // start listening to login and log out events
    this.listenToLoginEvents();
    // check to see if user has logged in before
    // if they have there will be a logged in event fired
    userData.checkedLoggedInStatus();
  }

  listenToLoginEvents() {
    // if the user is logged in then navigate to the Report page
    this.events.subscribe('user:login', () => this.rootPage = Report);
    this.events.subscribe('user:logout', () => this.rootPage = Login);
  }
/src/providers/user.provider.ts
In the previous step we saw that a UserProvider was referenced; this provider is declared in user.provider.ts.
The main job of the UserProvider is to check the username and password in order to receive an authentication token from the WordPress server. This job is outlined in the ‘login’ function.
The login function will:
- Contact the WordPress server with the username and password to ask for an authentication token.
- If successful the token will be used in every subsequent http call to the WordPress server. The way we do this is by creating our own http client and injecting the token in every header (see http-client.ts).
- The authentication token will be stored in case the user comes back to the app at a later date.
- An event is fired to tell subscribers that the user is now logged in.
// this is a unique token for storing auth tokens in your local storage
  // for later use
  AUTHTOKEN: string = "myauthtokenkey";

  // determine if the user/password can be authenticated and fire an event when finished
  login(username, password) {
    let data = { username: username, password: password };
    // remove any existing auth tokens from local storage
    this.stor.remove(this.AUTHTOKEN);
    // the important bit, contact the WP end point and ask for a token
    this.http.post('/server/wp-json/jwt-auth/v1/token', data).map(res => res.json())
      .subscribe(response => {
        // great we are authenticated, save the token in localstorage for future use
        this.stor.set(this.AUTHTOKEN, response.token);
        // and start using the token in every subsequent hhtp request to the WP server
        this.http.addHeader('Authorization', 'Bearer ' + response.token);
        // fire an event to say we are authenticated
        this.events.publish('user:login');
      },
      err => console.log(err)
      );
  }
/src/providers/http-client.ts
The HttpClient class has a very simple purpose; inject our authentication header into every Get and Post operation we make to the WordPress server.
// inject the header to every get or post operation
  get(url) {
    return this.http.get(url, {
      headers: this.headers
    });
  }
  post(url, data) {
    return this.http.post(url, data, {
      headers: this.headers
    });
  }
/src/providers/word-press-provider.ts
The WordPress provider has a single function: try to post the score and report data to WordPress.
The ‘createReport’ function:
- Sends a message to the app to tell it that a save operation has started (for the purpose of showing spinners etc).
- Sets the JSON data required by the WordPress REST API posts call (the full range of options can be seen here).
- Posts the information to our WordPress website.
- Gets back a success/failure message.
- Lets the App know we have finished the save.
createReport(score: string, report: string) {
    // let the app know we have started a save operation
    // to show spinners etc
    this.events.publish('wordpress:savestatus', { state: 'saving' });
    // set the JSON data for the call
    // see https://developer.wordpress.org/rest-api/reference/posts/#create-a-post for options
    let data = {
      title: score,
      excerpt: report,
      content: report,
      status: 'publish'
    };
    // the important bit, make a request to the server to create a new post
    // The Authentication header will be added to the request automatically by our Interceptor service
    this.http.post('/server/wp-json/wp/v2/posts', data).subscribe(data => {
      // tell the app that the operation was a success
      this.events.publish('wordpress:savestatus', { state: 'finished' });
      this.events.publish('wordpress:createdreport');
    }, error => {
      this.events.publish('wordpress:savestatus', { state: 'error', message: error });
    });
  }
/pages/login/login.ts
The login page is very simple. When the login button is pressed, the username and password input in the textboxes are passed to our UserProvider service.
username: string;
  password: string;
  constructor(public UserProvider: UserProvider) {
  }
  login() {
    this.UserProvider.login(this.username, this.password);
  }
/pages/report/report.ts
Again the report page is very simple. When the report button is pressed, the score and report input in the textboxes are passed to our WordPress service.
constructor(private events: Events, private wordpress: WordPressProvider, private user: UserProvider, private loadingCtrl: LoadingController, private toastCtrl: ToastController) {
    this.createLoader();
    this.listenToWordPressEvents();
  }
  createReport() {
    this.wordpress.createReport(this.score, this.report);
  }
Any Questions?
That’s basically all there is to it.
If you have any questions, or any amendments that I can make to the Github repo, then please comment below….
Hello and thank you for taking the time to create this great tutorial/instruction.
All works fine it seems but when I post a score to my wordpress site it get the “Error saving the report”
Where is this saving to? Is this creating a new post in the WP site?
Hi Jason,
Thanks for trying the sample out. Are you able to see the error that is being returned from the http call?
If using Chrome, press f12, go to the network tab and see what error is returned when you try to submit.
Conor
Hello Conor,
Yes below is what I am seeing in console:
POST http://localhost:8100/server/wp-json/wp/v2/posts 401 (Unauthorized) polyfills.js:3
Also:
Response {_body: “{“code”:”rest_cannot_create”,”message”:”Sorry, you…reate posts as this user.”,”data”:{“status”:401}}”, status: 401, ok: false, statusText: “Unauthorized”, headers: Headers, …}
s
Thank you for your help!
Hi Jason,
Are you able to log out an log back in again?
If so, and the problem persists, what are the contents of your ionic.config.json file?
Thanks,
Conor
Also, can you make sure that the user you are logging in as has ‘Author’ permissions on your site.
Conor
Hello Conor,
I am able to logout and then log back in. Here are the contents of my ionic.config.json:
{
“name”: “wp-rest-api-ionic2”,
“app_id”: “”,
“proxies”: [
{
“path”: “/server”,
“proxyUrl”: “https://mycompleteweb.net”
}
],
“type”: “ionic-angular”,
“integrations”: {}
}
Thank you again for your help
I’m having the same problem as Jason. Doesn’t matter what role I assign to user. No problems logging in but can’t create reports. “Error saving report” message and console displays “rest_cannot_create”, “status: 401”, “Sorry, you are not allowed to create posts as this user.”
Hi, thanks a lot for this tutorial, unfortunately i always get the missing “Access-Control-Allow-Origin” on login. I tried everything but it is not working, do you have any idea?
Thanks a lot.
HI. I’m a newbie with Ionic 3. My learning is ok. But when i’m making a signup feature in my app. I have a problem with authentication in header. Can you show me how to do it?
Hi,
Conor,
Hope you are doing well,
This is Sawan, I am new into the ionic hybrid development, I regularly follow your blog,
I Read your blog post for Ionic +Wordpress using jwt authentication, I found it very useful stuff,
However, I am middle of making my WordPress blog to a Hybrid App, I am totally stuck in middle,
So, I thought you are the best person who can guide me on this,
Below are few points in which I want take your advice or guidance,
1. first of all I want to put login & signup page as first page (which will authenticate from my online WordPress blog), which I already got from your tutorial, then after login authentication with jwt.
2. I want to authenticate my WordPress posts because in my posts in WordPress only logged in user can see the posts and make comments,
3.Also want to register users from my App,
4. Also need the option to create the comments & Posts,
5. I have one more concern which is my 90% of posts are in embedded pdf post format, so how can I put that on my ionic posts,
I know am seeking many things from you but I know only you can help me out.
I will really appreciate your help, please also refer online materials or blog posts or book, magazine etc. for the above, because I am like a beginner
Hi Sawan,
Thanks for the comment, I can certainly help.
1. Registering a user will be tricky as it seems it can only be done by an already logged in user: https://developer.wordpress.org/rest-api/reference/users/#create-a-user
An option maybe to use an IFrame to add your WordPress registration page into your app.
Or: create a server side call that will take email and password and create a user with limited capabilities
2. To restrict content for only logged in users, there are plugins for that: https://en-gb.wordpress.org/plugins/restrict-content/
3. See #1
4. Once a user is logged in they will be able to create posts and comments (if they have been give sufficient privileges)
5. Is the PDF an attachment to the post or part of the html?
For help and advice the Ionic slack channel is really busy: https://ionicworldwide.herokuapp.com/
For WordPress the WP Rest API docs are super: https://developer.wordpress.org/rest-api/reference/
Also good is the WordPress Facebook groups: a selection can be found here: https://www.elegantthemes.com/blog/resources/the-20-best-wordpress-facebook-groups-you-should-join
Hope this helps?
Conor
Thank you, Conorw, For your prompt reply, Let me implement your advice, Hoping your solution to work.