The speed of your website is important to users. But in this age of pay-per-compute, reducing processing all along the chain is important to keep owner costs down too.
Fortunately, in today’s modern web, both of these seemingly competing requirements actually complement each other; reducing processing costs can be achieved by improving site speed.
To explore how to improve site speed and reduce overall processing, lets start with the end in mind and work backwards.
Starting with the customer, what consititutes a ‘good’ user experience, in terms of speed?
Ultimate User Experience?
Imagine you are a first time visitor to your site. The ideal situation would be if an immediate view of your site was instantly available to the device you’re using. No javascript processing, no querying for data, no image optimizations, just the browser showing HTML and [inline] CSS (or even one big snapshot image of your content).
Bear with me, I know some sites need to show dynamic data and some do not, but remember, at this point, you’re just an ordinary user. You dont care about what goes on in the browser and on the server. Neither do I care what static vs dynamic is, or what pain it takes to achieve results. You just want a great experience.
As a user, I want to see the content immediately. By the time I’ve made sense of the initial page (0-3.8secs), I want to interact with it.
If the data a customer is viewing is updated server-side while the page is open, these updates should be pushed to me automagically. Getting new data should not rely on me to fetch the data e.g. by hitting some kind of refresh button to call back to the server.
If the customer leaves the site and comes back to it, by the time I have indicated that I wish to view the page (preemptive rendering?), it should already be fully loaded and no stale data exists on the screen. If any updates have been made to the page since I last saw it, the changes, and only the changes, should have been pushed to my device, using as little bandwidth as possible.
All sounds great? But are these demands even possible using the latest tools/technologies for web and server?
Server Side Rendering
Arguably one of the most important things is to show the content of your site in the quickest way possible.
Generally, the steps that a browser takes to display a web page are as follows:
- A request to the server is made for a webpage.
- The server decodes this request and the page, and its resources (files), are downloaded.
- The web browser uses the page resources to build the page.
- The page then is rendered (displayed) to the user.
The bottle-neck in this process are steps 2 + 3 i.e. downloading the resources and ‘building’ the page as the resources become available. Rendering a ‘built’ page, stage 4, is what a browser is really good at.
Can we improve, or even skip, steps 2 + 3 to give users a better experience?
If the customer’s browser isnt going to do the hard work to pull all the resources together to build the page, who’s going to do it then?
Combining and building the page can be perfomed on the server instead. The subsequent ‘built’ page can be the resource that is served to the customer.
Server side rendering is an ‘old’ method of serving web pages. Before client-side Javascript was as powerful as it is today, SRR was a common way to serve dynamic web pages.
What’s changed is that now you can use Javascript on both the client and server. You can now replace PHP, Java, ASP etc on the server with NodeJs. This certainly helps with code reuse between client and server, but are we actually any further forward?
The principles are still the same. Client browser makes call to server, server dynamically creates a webpage containing an initial view of the page, server then delivers the page to client.
Server side rendering certainly solves the processing problem for the customer but we’ve just pushed the problem server-side. Not only have we increased the amount of processing that we, the site owner, has to pay for. We are also not much further in improving the overall speed of the site. Certainly, the customer may see a more complete view of your site sooner. Also, the server may have better access to some of the resources. But the overall amount of processing to build the page stays relatively the same.
If we, as a site owner, are now paying for the processing to ‘build’ an inital view of the site how can we make this process as efficient as possible?
Static First
The vast majority of content on the web changes infrequently. Even sites with ‘dynamic’ content, usually only a small amount of the total content of a page is truly dynamic.
If the same content is going to be viewed by more than one visitor, why generate it more than once? It might not be a big issue if you only have 2 visitors. But even with 11 visitors, you still might be doing 10x more processing than was needed.
If as much of your content can be precompiled i.e. the data has already been fetched, the styles applied and html generated preemptively, it can be delivered to the user quicker. If fact, if the content is already compiled, we can take the server out of the chain completely for this interaction, and allow the browser to access the content directly from a location close to the customer.
The ‘static first’ strategy is to compile a static view of the page first, serve it from a CDN, delay enabing javascript until the page has loaded, then hydrate any stale dynamic data.
By adopting static first you can potentially reduce your hosting costs to cents per month, as opposed to dollars, AND provide a blisteringly fast experience for your customers
But what about pages that are never viewed? To statically generate an entire site, you need to generate and manage updates for all potential routes in your website. You might be generating hundreds or thousands of web pages that real users may never visit. However, although ‘real’ users may not visit these pages, it is likely, and welcome, that at least 1x crawler bot will want to access these pages (unless it is content not for the eyes of search engines).
Caching Vs Static Site
So if having assets ready and available on the network, close to the user, is preferable. Is this not just server caching?
Yes and no. There are a number of different caching options available for your site. You can cache the individual items that are referenced by your page e.g. images, css files, database queries etc, or you can cache the page itself, or both. A static first strategy will try to cut the cord with the server. The strategy does not require database query caching and processes as much into a cachable unit i.e. page caching. Caching is generally performed dynamically i.e. the caching happens when one or more users access a particular page. Static site generation is performed pre-emptively i.e. before any users access a particular page. Caching and static site generation both have the aim of making reused assets as available and as close to a user’s device as possible; the difference is if this is done entirely pre-emptively or dynamically.
Static First, Only Update Dynamic Data
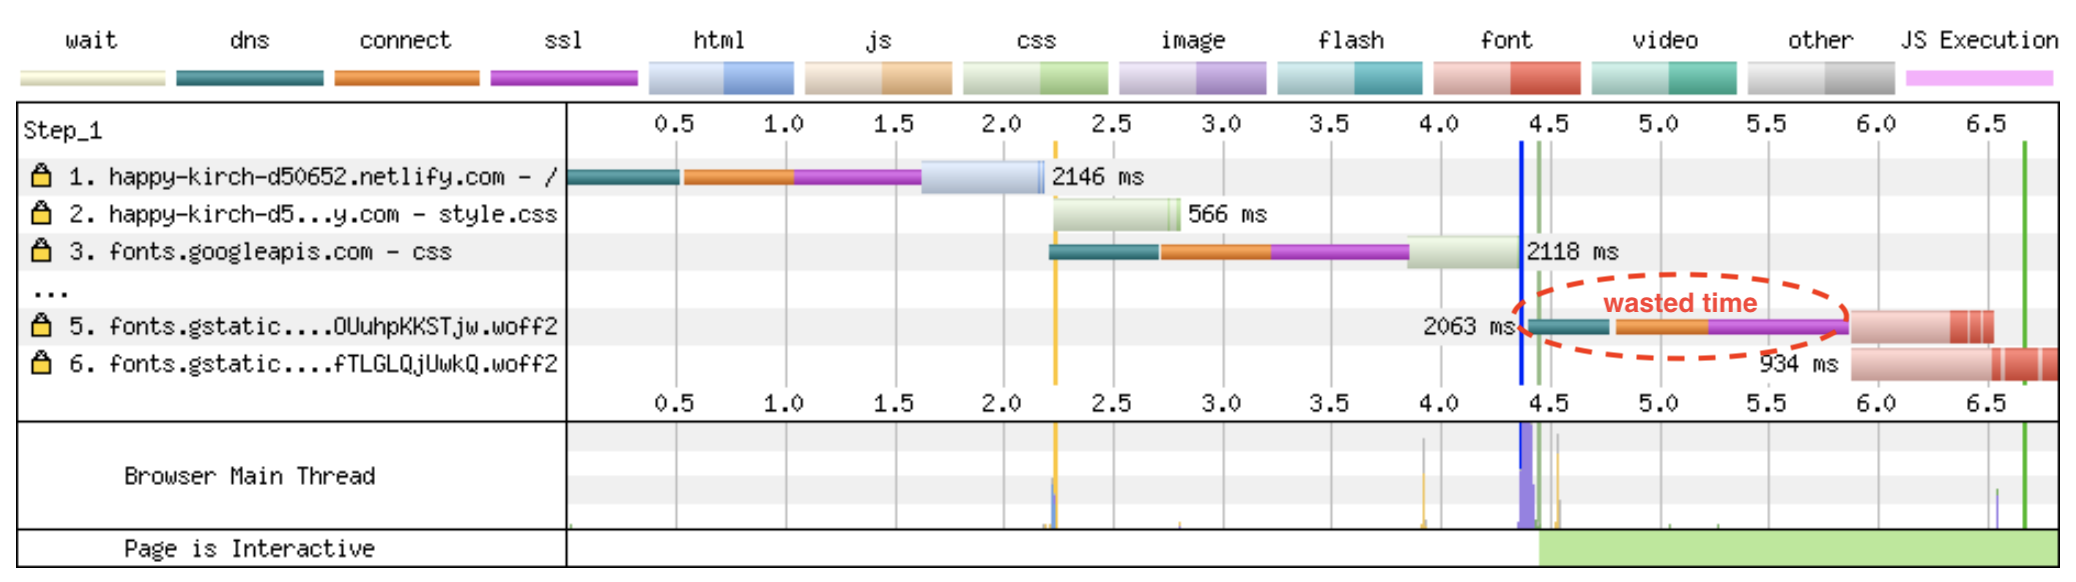
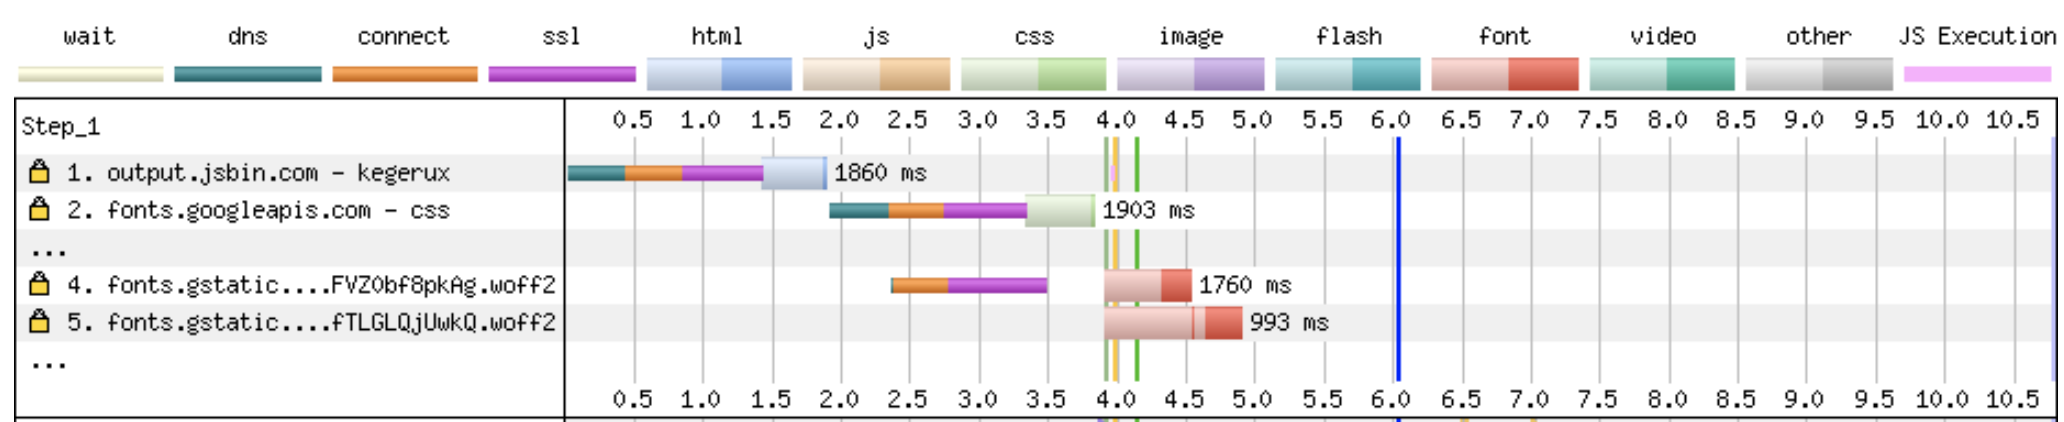
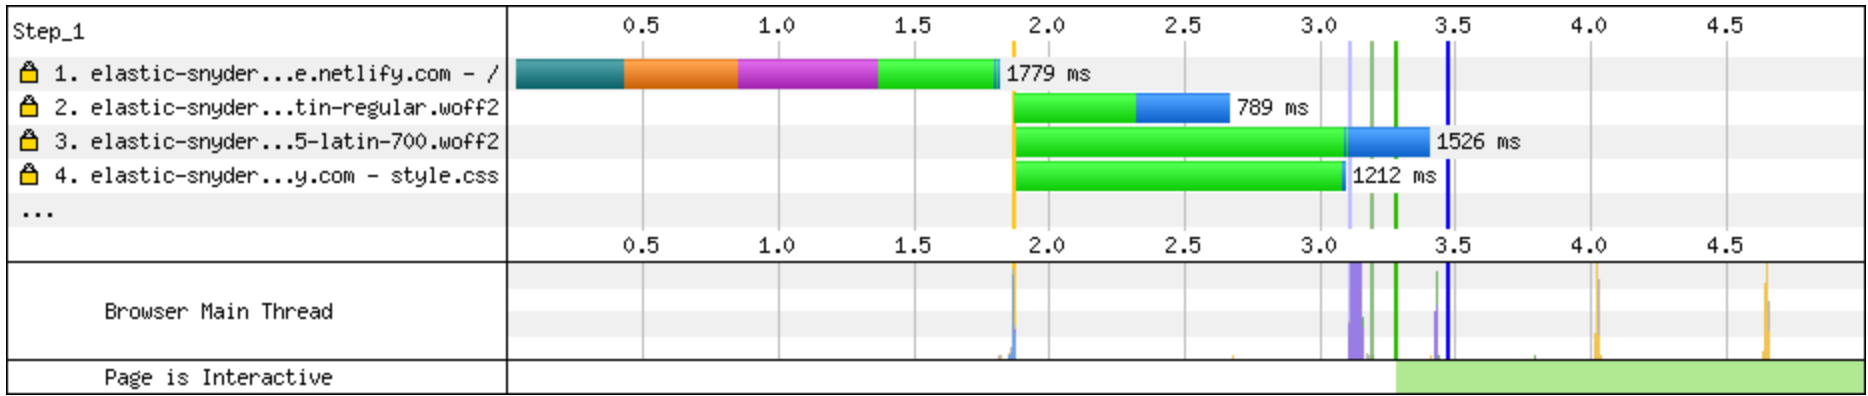
However, frequent updates may be unavoidable depending on the type of site. For dynamic sites, it is not feasible to continually pre-compile all views for all users, especially when the data is changing frequently.
But remember again, your user does not care. Mostly, they dont understand the difference between static and dynamic sites; they want to see the important content, fast.
You can aim to statically compile as much of the page as possible beforehand, but the ‘dynamic’ parts will involve some sort of processing. As a first time user, I may accept having the page load, seeing a placeholder where the dynamic data should be, and then ‘hydrating’ the data on page load. On the other hand, the user may, in this instance, prefer a slightly slower page load, if the page loads with the data already fully ‘hydrated’. The choice probably depends on what makes your customer happiest.
Subsequent Visits & Data caching
Up until now we’ve generally been concentrating on the scenario when customers first visit your site. When a customer visits your site again, the situation is slightly different. A returning customer will already have, on their device, many of the resources for the page. If nothing has changed, they may even already have everything to show the page again.
As a returning user, it makes little sense for me to have to contact the server again, have a new view generated by the server and download a new page. If only a small subsection of the page I already have has changed, this is unnecessary processing.
The ideal situation is if the server actually pushes my browser updates. When this happens my browser doesnt have to continually ask if new data is available. An even better scenario is if the server has already pushed me the data before I open the page again.
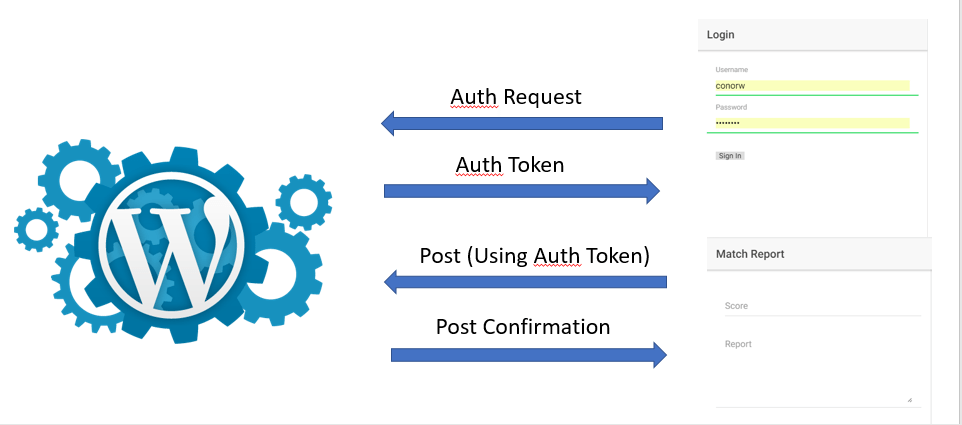
Even if you dont consider websockets and/or service workers you still have the opportunity to cache api data on the server. If a piece of data has not changed since the last time your browser (or any other browser) asked the server for it, it introduces unnessecary processing. Not for the feint hearted, but api caching can be achieved using the ETag header of a HTTP call.
Final Note. Software Development is hard.
There are only two hard things in Computer Science: cache invalidation and naming things.
— Phil Karlton
There are lots of difficult things about software development, but cache invalidation is the devil.
To reduce processing, all the methods above require caching in some shape or form. Static website generation is just page caching by another name. Putting things in cache is easy, knowing when to update them is incredibly difficult.
If your website page changes url, should you rebuild your entire site in case other pages reference the changed page? Does this re-introduce more processing than its worth?
If you statically compile your stylesheets inline into the page, what if a stylesheet changes? Does every page need compiled again, even if it doesnt make use of the changed style?
If a property in a row of data in your database changes, how do you invalidate your api cache? What if the data is referenced by another item in the cache?
If you are a masochist and like solving these type of problems, have at it. For the rest of us mere mortals, look to use a tool or service that helps you manage these problems.
Here is a non-exhaustive list of some newer tools and services that help in this space:
Hugo – Static website builder
Shifter – Compile your WordPress site to static
Vercel – JAM Stack + React Server Side Rendering + Hosting
Netlify – JAM Stack + Hosting
Webiny – Almost serverless Static website builder + API Generation
Svelte – Javascript framework that precompiles to plain JS so you dont need to deploy and load a framework with your webapp.